Quick Answer: Repot your trident maple bonsai just as the buds begin to swell in late winter or early spring — before they actually open. This biological cue, not the calendar date, is your signal. In practice, that means anywhere from late January (Zone 8–9) to early April (Zone 6), depending on your climate.
Knowing when to repot trident maple bonsai is the single most important skill you can develop for this species. Get the timing right and the tree bounces back with vigorous new growth within weeks. Get it wrong — repotting in midsummer or deep dormancy — and you’re looking at a stressful recovery season at best, a dead tree at worst.
When to Repot Trident Maple Bonsai: The Golden Rule
Repot at Bud Swell, Not by the Calendar
Watch your tree, not the date. The moment buds begin to fatten and push — but before any green tissue actually separates — that’s your window. At this stage, the tree has completed dormancy, stored energy is mobilised and ready to fuel new root growth, and it isn’t yet burning resources on leaf production. Root disturbance at this point is remarkably well-tolerated.
Repot too early (buds still hard and dormant) and the roots sit in disturbed soil without the hormonal signal to regenerate. Too late (leaves already unfurling) and you’re cutting roots just as the tree is demanding maximum water uptake. The bud-swell window is genuinely narrow — sometimes just two to three weeks — so check your tree every few days once late winter arrives.
Repotting Window by USDA Zone
| Region | Typical Window |
|---|---|
| USDA Zone 6 | Mid-March to early April |
| USDA Zone 7 | Late February to mid-March |
| USDA Zone 8–9 | Late January to late February |
| UK / Northern Europe | Late February to late March |
| Southern Hemisphere | Late August to late September |
These are guidelines, not rules. A cold snap in Zone 7 can push bud swell into mid-March; a warm February can trigger it early. Always let the tree tell you.
How Often Should You Repot Trident Maple Bonsai?
Acer buergerianum produces dense, fibrous feeder roots at a remarkable rate. A healthy tree will fill a bonsai container in one to two growing seasons, which makes repotting a genuine maintenance requirement rather than an occasional luxury.
Repotting Frequency by Development Stage
| Development Stage | Repotting Frequency |
|---|---|
| Young trees in training (under 10 years) | Every 1–2 years |
| Maturing trees (10–20 years in training) | Every 2–3 years |
| Mature, refined trees | Every 3–5 years |
These are starting points. A vigorously growing young tree in a small pot may need annual repotting. An older tree in a large pot with slower growth might be fine at four years. Use the schedule as a prompt to check, not a command to act.
Signs Your Tree Needs Repotting
Don’t wait for all of these — any one is worth investigating:
- Roots visibly circling the base of the pot or pushing out of drainage holes
- Water pooling on the soil surface and draining slowly
- Noticeably reduced vigour despite good feeding and watering
- The root ball lifting slightly when you pick up the tree
How to check: In late winter, before bud swell arrives, gently tip the pot sideways and ease the root ball out an inch or two. If roots are densely circling the outer edge and the mass holds its shape, it’s time. If loose soil is still visible and roots haven’t reached the pot walls, slide it back in and check again next season.
Neglect the root system long enough and the consequences compound: roots circle and strangle each other, akadama breaks down and pore space collapses, drainage slows, oxygen drops, and fine feeder roots suffocate. Vigour declines, the tree becomes vulnerable to pests and disease, and recovery becomes much harder.
Every repotting session is also a chance to comb out and position surface roots for better nebari, remove circling or crossing roots before they cause long-term damage, and inspect root colour and texture. Healthy trident maple roots are white to pale tan and firm. Dark, mushy roots mean trouble — and you’d far rather find that at repotting than in midsummer.
The Ideal Soil Mix for Trident Maple Bonsai
Akadama, Pumice, and Lava Rock Ratios
The standard mix that works reliably across most climates:
- Akadama: 40–50% — retains moisture, provides cation exchange capacity, and breaks down gradually to improve root anchorage
- Pumice: 25–30% — improves drainage and aeration; lightweight; doesn’t break down over time
- Lava rock (scoria): 20–30% — excellent drainage, adds stability, very long-lasting
In high-rainfall climates, add up to 10% decomposed granite or coarse horticultural grit to push drainage further. The goal is a mix that drains freely within seconds of watering but holds enough moisture that roots don’t dry out completely between waterings.
Particle Size
- Standard bonsai: 3–6mm particles
- Shohin and mame: 1–3mm particles
Smaller particles in smaller pots help with moisture retention without sacrificing drainage. Large-particle mix in a tiny pot creates air gaps too large for fine roots to bridge effectively.
Soils to Avoid
- Pure akadama: Retains too much moisture and breaks down too quickly, collapsing drainage
- Standard potting mix or garden soil: Compacts under regular watering, suffocates roots, promotes rot
- Peat-based mixes: Acidifies soil below the preferred pH range and has poor long-term structure
Trident maple prefers a slightly acidic to neutral pH of 6.0–7.0. If you want to add a slow-release organic fertiliser at repotting time, place pellets on the soil surface or in the top layer — not mixed through the entire pot.
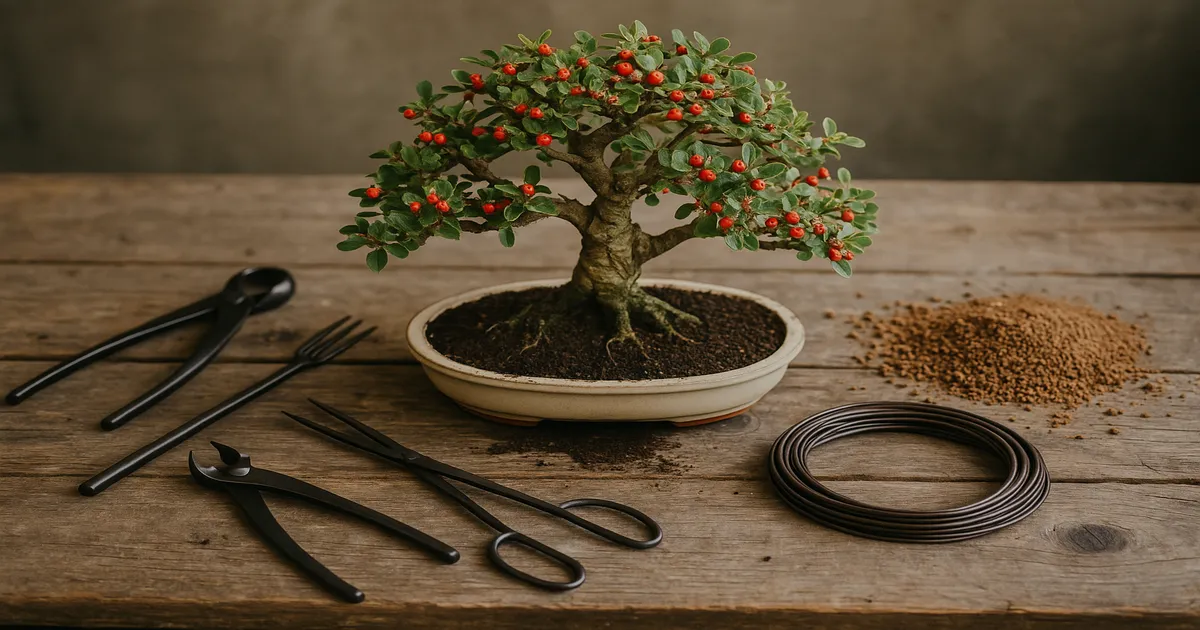
Step-by-Step Repotting Process
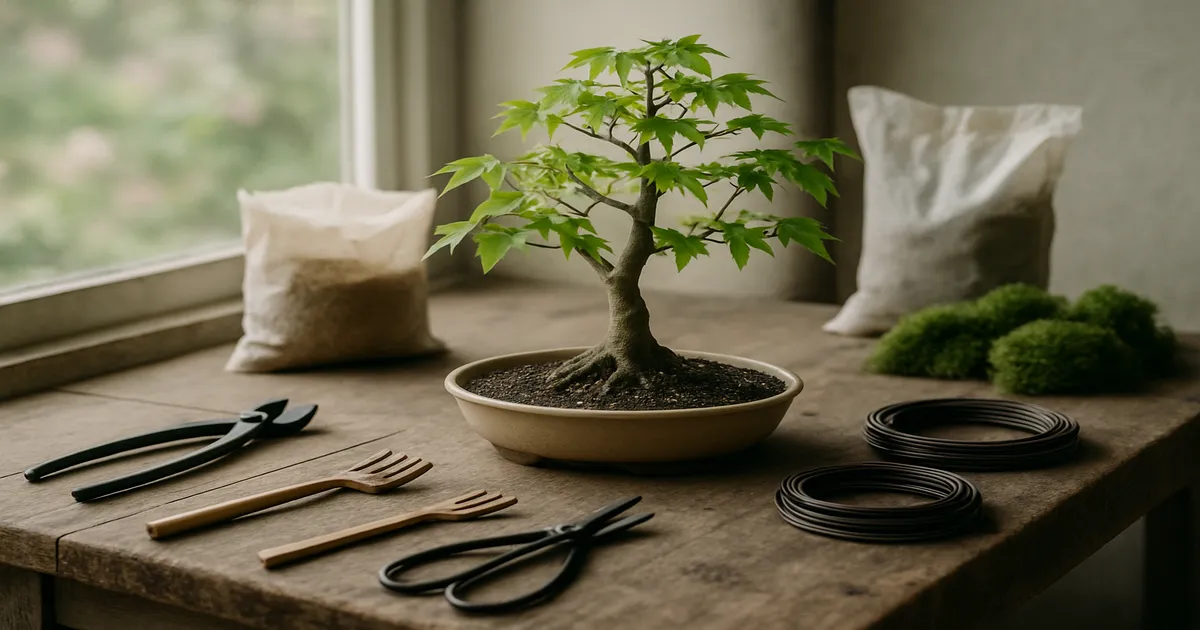
Tools and Materials
- Root hook and chopstick (for combing out roots)
- Root scissors and a quality concave cutter — clean cuts heal significantly faster than crushed ones
- Wire mesh cut to cover drainage holes
- Tie-down wire to secure the tree in the pot
- Fresh, pre-mixed soil
- A clean pot, washed and dried if reusing
Removing the Tree and Combing Out the Roots
Run a root sickle or thin spatula around the inside edge of the pot to break the root seal. Tip the pot and ease the root ball out — don’t yank. Work the root hook or chopstick through the outer root mass, combing downward and outward to loosen compacted roots and remove old soil. You want to expose the roots clearly so you can see what you’re working with and position surface roots intentionally.
How Much Root to Prune
On a healthy, vigorous tree, removing up to one-third of the root mass is safe. Be more conservative — closer to one-fifth — on older trees, recently stressed trees, or any tree where you found root rot during inspection.
- Remove all circling roots cleanly with sharp scissors
- Trim long, extending roots back to encourage compact, fibrous growth
- Cut any dark, mushy, or damaged roots back to healthy tissue
- Make clean cuts — crushed or torn roots invite disease
Positioning, Potting, and Aftercare
Place mesh over the drainage holes and thread tie-down wire up through them. Position the tree in the pot — take time here to find the best nebari presentation and planting angle. Secure with tie-down wire to prevent movement while new roots establish.
Add fresh soil in stages, working it into all air pockets with a chopstick. Tap the pot gently to help soil settle. The finished surface should sit slightly below the pot rim so water can pool briefly during watering.
Aftercare:
- Water thoroughly until water runs freely from the drainage holes
- Move to a sheltered spot — out of direct wind and protected from late frosts
- Keep in bright indirect light until the first leaves harden off
- Withhold fertiliser for 4–6 weeks; new root tips need to regenerate before the tree can use nutrients effectively
- Water moderately — the reduced root mass can’t support the same uptake as before
Pruning and Wiring Around Repotting Time
Late winter — the same narrow window as repotting — is also the best time for structural pruning. Wounds callus quickly once spring growth begins, and you have clear visibility of branch structure without foliage in the way. Combining structural pruning with repotting is preferable to spreading the stress across multiple sessions. The tree recovers from one concentrated disruption more effectively than from repeated disturbances.
Don’t combine heavy defoliation with repotting, though. That’s too much at once.
The optimal wiring window is just before bud break — branches are at their most flexible and bark isn’t actively growing, so wire marks are less likely. Avoid wiring immediately after repotting; the tree is already managing root stress. Once growth is underway, check wired branches every two to four weeks. Trident maple grows fast enough that wire can cut into bark in as little as four to six weeks during peak growth. When you see wire beginning to embed, remove it immediately.
Apply cut paste to any cut larger than 6mm right away — don’t leave wounds open overnight. Reapply if the paste cracks or falls off during the first growing season. Trident maple calluses relatively quickly for a deciduous species, but large wounds still benefit from protection.
Troubleshooting Common Repotting Problems
Tree not leafing out after repotting: Do a scratch test first — lightly scratch the bark on a small twig with your fingernail. Green beneath the surface means the tree is alive. If you repotted at the correct time, shelter and patience are usually the answer. Keep soil consistently moist and resist the urge to fertilise or disturb the roots further.
Wilting or leaf scorch post-repotting: This almost always comes down to wind exposure or premature full sun. A freshly repotted tree with a reduced root mass can’t handle the transpiration demand of a hot, breezy day. Move it to a sheltered, shaded spot immediately. Light morning misting can help short-term, but reducing environmental stress is the real fix.
Root rot discovered during repotting: Act decisively. Remove all affected roots with sterile scissors, cutting back to firm, healthy tissue. Dust the cuts with sulphur-based fungicide powder. Repot into fresh, well-draining mix and reduce watering frequency going forward. The tree may look rough for the rest of the season, but a clean intervention now gives it the best chance of full recovery.
Repotted at the wrong time: Minimise any further root disturbance. Move to a shaded, sheltered spot immediately. Keep moisture consistent — not wet, not dry. Withhold fertiliser until clear signs of recovery appear, and accept that growth will be reduced that season.
Frequently Asked Questions
Can I repot trident maple bonsai in summer?
Strongly discouraged. During active growth, the tree depends on its full root system to supply water to the canopy. Disturbing roots in summer causes immediate stress and risks dieback. If you discover root rot and have no choice, minimise root disturbance as much as possible, move the tree to shade and high humidity, and accept reduced growth that season.
How do I know when my trident maple bonsai needs repotting?
The clearest signs are roots emerging from drainage holes, roots visibly circling the pot base, and noticeably slower drainage. Reduced vigour despite good care is another indicator. The most reliable method is to gently ease the root ball out in late winter and inspect directly — don’t guess when you can check.
Should I fertilise my trident maple immediately after repotting?
Wait 4–6 weeks. The fine root tips that absorb nutrients have been disturbed, and applying fertiliser before they’ve regenerated can burn roots and set the tree back. Once new growth has hardened off and you’re seeing healthy extension, begin with a balanced or nitrogen-forward fertiliser.
Can I prune and repot trident maple at the same time?
Yes — structural pruning in the same session as repotting is actually the preferred approach. It concentrates stress into one recovery period rather than two. The exception is heavy defoliation: never defoliate and repot simultaneously, as that removes too much of the tree’s energy-producing capacity at once.
What is the best soil mix for repotting trident maple bonsai?
A mix of 40–50% akadama, 25–30% pumice, and 20–30% lava rock works well for most growers. Use 3–6mm particle size for standard trees and 1–3mm for shohin and mame. Avoid garden soil, potting compost, or pure akadama — all will cause drainage problems and compromise root health over time.